The post How to select the right isolator? appeared first on Walraven Singapore.
]]>- Equipment specifications
You need to check the type of equipment to be isolated together with its dimensions, structural attachment points, and location within the building. Other considerations include the installation and foundation requirements as well as the specifications such as the bolt and hole sizes for securing the equipment. - Location of equipment
You need to know where the machinery is located and what its structural support is. For example, is the equipment placed on a grade slab in a basement or on the top of the roof? - Vibration excitation of the equipment
Rotational frequency forces and couples are important considerations here. The forces and couples caused by reciprocating masses can influence the isolation requirements. - Type of building
The type and use of the building can have a significant impact on the choice of the isolator. Different building types like hospitals, apartment complexes, entertainment centres or industrial facilities are used for different purposes and consequently have different isolation requirements. - Environmental considerations
Whether the equipment is placed indoors or outdoors can make a big difference, but under all circumstances, you need to consider environmental factors such as the degree of corrosivity and the minimum and maximum ambient temperature near the equipment. - Special requirements
Last but not least, you need to check if there are any special requirements. Think about electrical, tubing, piping, or ducting connections that might modify the mechanical response of the mounting system. Other special requirements can include externally applied forces or moments; minimum or maximum clearance requirements between equipment and foundation; alignment requirements; or dynamic loads.
How to evaluate the suitability of an isolator?
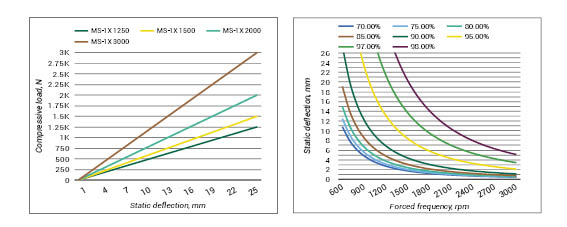
Once you have a full overview of all the relevant environmental and external factors, you need to select the isolator that provides you with the most efficient solution. Vibration can be isolated or reduced to a fraction of the original force with isolators placed between the equipment and the supporting structure.
When it comes to the selection of an isolator, you need to look at three different values. These are the static deflection and the natural frequency of isolators together with the running frequency of equipment mounted on them.
Learn more about the anti-vibration solutions from Walraven
In the Walraven portfolio, you can find a complete range of rubber and metal vibroacoustic isolators of anti-vibration pads, mounts and springs to eliminate vibration problems in HVAC installations. The isolators can also be easily integrated with other typical pipe fixings, rail support or rooftop installations.
The post How to select the right isolator? appeared first on Walraven Singapore.
]]>The post How to save up to 50% with BIM and Walraven appeared first on Walraven Singapore.
]]>If you are still one of those who believe that BIM is a software or a very advanced or technological tool and that is beyond the scope of your installer or construction project, we have a news for you, it is not! It is totally accessible, as well as profitable for your company.
BIM, Building Information Modeling, is a working methodology for the creation and management of a construction project, which from programs such as Revit®, ArchiCAD® or AllPlan®, allows you to create digital design simulations, incorporating 4D and 5D tools with which you can have real-time data about the duration and costs of materials and structures necessary for your installation. In this way, you can manage information intelligently throughout the life cycle of a project.
Companies in the sector that have already switched to BIM, estimate up to 50% of savings in money in the design phase of the project; 30% in the construction phase of the work and up to 20% in logistics concepts. All of the above is due to the minimization of errors that BIM allows before, during and after the project, such as: collisions or unnecessary material expenses. This is thanks to the initial construction of a 3D digital model with which you can foresee any incident.
In turn, the collaborative environment of BIM will allow you to have an optimal communication between the builders, manufacturers, architects and civil engineers of your project, creating a collaborative network that will increase productivity and coordination between departments.
Walraven offers a comprehensive advisory service, with a specialized technical team, that will help you implement BIM in your company for modeling the architecture, engineering and construction of your projects. For this, we use Revit®, the best option in software when designing your project, from its conceptualization to the planimetry of its construction.
But that is not all! The permanent update of your project in Revit® will allow you to consult and extract information from the installation using as-built maps. In this way, you will be able to know, from the type of pipes and their final route to the model of installed air conditioning machines. With the monitoring of this data, the maintenance of a building during its useful life, its daily management will be easier than you imagine.
You can find all our families in Revit® downloadable files in the BIM Library. Our specialized library offers information on parameterized product families, with detailed geometry and completeness of all our support solutions and for installations of: HVCA, plumbing or electricity.
In Walraven you will find a free modeling service for specific assemblies, with which we respond to complete support solutions for MEP BIM projects with an LOD400. Likewise, we offer support in the creation of .rfa files and introduction of said product families in the installations project.
Realizing your projects in BIM hand in hand with Walraven, you will always obtain the optimal precision in the measurements of your project, as well as a great reduction in costs and time. What are you waiting for to move to BIM?
Send us an e-mail to [email protected] and get 100% free advice from our technical team.
The post How to save up to 50% with BIM and Walraven appeared first on Walraven Singapore.
]]>The post How to choose the most suitable pipe clamp for your project? appeared first on Walraven Singapore.
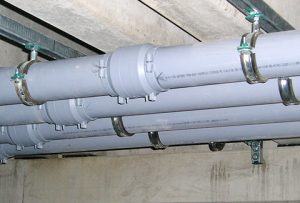
]]>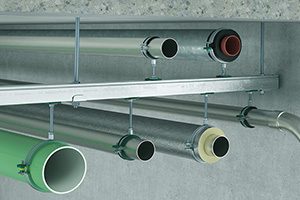 When fitting HVAC or sanitary installations, there are a number of factors to take into account before deciding on the fixings that you need. For example, pipes will expand and contract due to temperature changes and therefore require suitable fixings. The pipe clamps are the first elements to tackle the forces generated from expansion in the total fixing system: via the clamp through the threaded rods and rail constructions up to the fixing into the ceiling or walls. Secure fixing of the pipe all starts by choosing the right clamp.
With the new and improved Light 2-Screw clamps it becomes easier to choose the right solution for your residential, public or industrial project. The design of the installation and the choice of pipe material dictate your pipe clamp requirements. Whether the pipe is steel, copper or plastic Walraven’s Light 2-Screw clamps offer a suitable solution.
The following factors need to be considered when selecting the right clamp for your needs. The Light 2-Screw clamp ranges have been designed with these considerations in mind. Here we tell you how the Light 2-Screw clamps are designed to deal with each variable:
 Temperature:
The standard temperature range of -30 up to + 120 °C, the pipe’s expansion is influenced by the temperature of the medium.
 Maximum load:
All pipe clamps have been submitted to safe load tests. The specified maximum allowed loads (Fa,z), according to RAL-GZ 655/B, are calculated using specific statistical methods related to the breaking load and taking into account a deflection of 1.5mm or 2% of the maximum nominal clamp diameter.
 Pipe material:
The pipe material will affect the severity of the reaction to temperature changes. There are many types of plastic and metal pipe materials: PE, PVC, PP, Steel, Copper, Cast Iron, etcetera. Each has, among other things, a different temperature resistance and also different resistance levels to chemicals such as oils, greases, acids, chlorine. This affects what type of clamp should be used. For example: The lined Walraven Bifix® 5000 G2 clamp should be used for plastic pipes. An unlined galvanized steel clamp should not be used to mount a copper pipe as it can lead to corrosion.
 Size:
Size:
The inner side size of the clamp is based on the outer diameter of the pipe. Some of our clamps, like the Walraven Bifix® 5000 G2, allow the pipe to slide freely through the clamp in case of expansion/contraction due to temperature differences. By removing the distance washers from the clamp before mounting it you can also make the clamp suitable for tight fixing. Based on standard pipe diameters, the Walraven 2-screw clamps cover all pipe sizes up to 225mm.
 Environment:
The environment into which your pipes will be installed affects the your choice of clamp. Internal? External? Exposed to severe weather in coastal environments? It is an important consideration and will more than likely require a pipe clamp with a special coating for corrosion resistance such as the Walraven Bifix® G2 range.
 Special requirements:
Some construction projects can have special requirements such as noise insulation or fast installation needs. Many of the 2-Screw lined clamps have certified levels of sound insulation (DIN4109 / -18dB(A)) as well as fast-fit features.
The best solution: talk to our experts!
Do you want more information about our pipe clamp range in general or about our new and improved Light 2-Screw clamps in particular? Or can we help you in determining and planning the most effective fixing system for your pipe installations? Please feel free to contact us to discuss this with our experts. Our technical engineers have many years of experience with technical challenges on pipe installations and are happy to advise you. Don’t hesitate to get in touch!
Contact our technical engineers
The post How to choose the most suitable pipe clamp for your project? appeared first on Walraven Singapore.
]]>The post How to avoid common anchor installation errors appeared first on Walraven Singapore.
]]> Incorrect installation is the leading cause of problems encountered with heavy duty anchors. Poor installation may lead to a reduction of safety margins that are built into the anchor design process, a failure of the anchor during installation or during its service life. Some anchoring products are more sensitive to installation errors than others, but in any application, the full performance expected from an anchor can only be achieved if the correct installation process has been followed.
All anchors should be installed in accordance with the manufacturer’s prescribed installation procedure, which is always documented in the European Technical Assessment of a given product. Therefore, the first step in making safe installations is to study and familiarise yourself with the official installation instructions and follow them.
Correct hole cleaning
One, sometimes overlooked aspect of the installation procedure, is the cleaning of a drilled hole. For mechanical anchors, cleaning the drilling dust out of the hole with a blow-out pump is generally sufficient. With the dust removed, it will not interfere with the anchor’s functioning mechanism and the anchor will have sufficient space in the hole to reach its intended embedment depth.
The hole cleaning procedure for chemical anchoring systems, however, is especially important. During the drilling, the drill bit compresses dust onto the surface area of the hole. Air generated by a blow-out pump or even compressed air is insufficient to dislocate the dust and remove it. If the dust is not removed, the injected resin will bond to the dust instead of the concrete itself, and this will result in a significant performance loss of the anchor. The hole should be cleaned with a sequence of blowing and brushing operations, which is always detailed in a product’s approvals or technical documentation. The brush should have a slightly larger diameter than the hole it will be used to clean. Avoid using nylon brushes, as their cleaning performance is generally low. Walraven recommends using hybrid brushes made of steel wire and natural bristle. If you are unsure what diameter or type of cleaning brush you should use, please feel free to contact our experts.
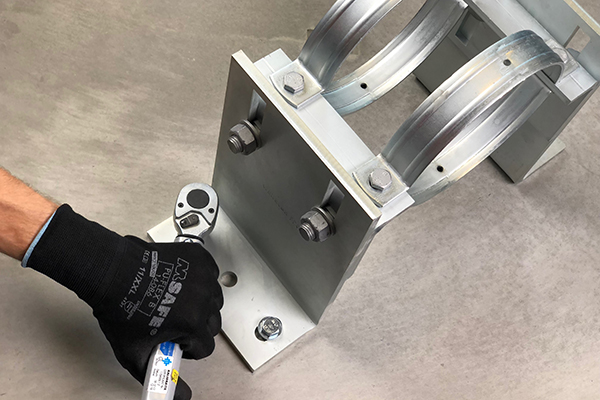
Minding the torque
Apply too little torque on a torque-controlled anchor and it will not deliver it’s intended performance. Apply too much torque and you will risk over-stressing the anchor and thus also affecting its performance. If you over-torque a chemical anchor installation, you may break the chemical bond between the resin and the steel element. If you do not tighten a fixture sufficiently, the gradual relaxation of the nut may reduce clamping force induced and thus jeopardize its safety. Considering this, applying the correct amount of torque is always important.
With a few exceptions, like some hammer-in anchors, most heavy duty concrete anchors require controlled-torque either to be set correctly or for correct tightening of a fixture. Getting it wrong without using a torque-wrench is very easy and the risk for adversely affecting the anchor performance is high. At the same time, torque-wrenches are widely available and torque-related installation issues can be avoided by using them.
Products’ approvals and technical documentation will always specify the amount of torque required to complete the installation correctly. Mind the torque, and you will be one step closer to installing safe anchors!
Summary
Correct hole cleaning and application of torque are two important aspects of anchor installation. Before installing anchors, familiarize yourself with their installation procedure and ensure that you have the right tools and accessories to install and set them.
Do you want more information about our Heavy Duty Anchors? Or can we help you in determining which anchor is the best for your installation? Please feel free to contact us to discuss this with our experts. Our Walraven Technical Support Teams are always ready to help you with your project and provide advice on installation of anchors. Don’t hesitate to get in touch!
Visit our Heavy Duty Anchor page
The post How to avoid common anchor installation errors appeared first on Walraven Singapore.
]]>The post How to prevent damage to your rooftop appeared first on Walraven Singapore.
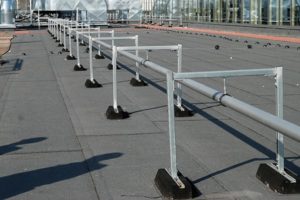
]]>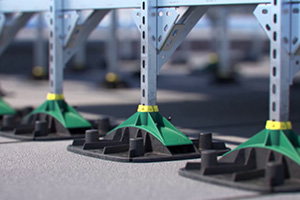 To maintain your roof in an optimal condition it is essential to avoid the pressure on the roof membrane becoming too high that it gets damaged over the years. Optimal distribution of the load and reduction of dead weight protect the roof surface. It is equally important to ensure the waterproof roof membrane is not penetrated. These penetrations create problematic areas that always, sooner or later, cause serious problems and thus shorten the lifetime of the roof. This results in having to make unexpected and costly repairs. Mounting roof installations using our flexible, modular, non-penetrative support solutions prolongs the lifetime of the roof and reduces or eliminates any potential repair costs.
Roof deck construction
Residential, commercial and industrial buildings usually have, what is called, a ‘warm roof’. A characteristic of this type of roof is that the insulation layer is installed on top of the roof instead of laid between the rafters of the roof (‘cold roof’). Thus, the entire roof structure is insulated; and therefore, more energy efficient. To protect the rooftop and retain the correct fall this layer of insulation material should not be overloaded and/or compressed more than tolerated. The waterproof exterior layer must not crack; water could leak below this top layer and cause blisters that will damage the rooftop itself. Also, the environmental circumstances e.g. snow on the roof (load) and/or wind across the roof (uplift) must be taken into account. Designing for wind uplift is important.
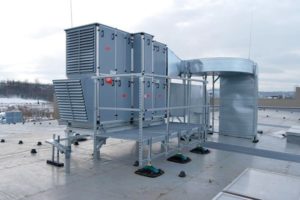
Rooftop units and their support systems
Rooftop units in combination with their support systems can place a heavy burden on a building’s roofing system and must be properly supported to preserve the roof’s structural integrity. We are aware that often there is little space to work, installations cannot be attached directly to the rooftop and reduction in installation time is essential. Walraven designs and manufactures solid, reliable, non-penetrative support solutions that excel in adjustability. From lightweight piping support to complex heavy-duty systems, we use only the highest quality materials. Our systems include the modular Walraven RapidStrut® channel system with Walraven BIS UltraProtect® 1000 surface treatment ensuring maximum corrosion protection.

The best solution: talk to our experts!
Do you want more information about our rooftop systems? Or can we help you in determining and planning the most effective support solution for your rooftop installation? Please feel free to contact us to discuss this with our experts. Our technical engineers have many years of experience with technical challenges on rooftops and are happy to advice you. Don’t hesitate to get in touch!
Get in touch and find out how we can support!
The post How to prevent damage to your rooftop appeared first on Walraven Singapore.
]]>The post The best sound-proofing for your installation project appeared first on Walraven Singapore.
]]> provide us with a healthy indoor climate and comfort. A disadvantage of this is that we have more sources of noise. An additional requirement, that is often requested, is that installations do not cause noise pollution. We would like to share our experiences and capabilities of sound-proofing.
Rubber lining
It is important to mute or disconnect the noise (vibration). A major step in reducing or eliminating noises coming from an installation (heating/cooling/ventilation, etc,) is to use brackets with rubber lining. Rubber has the fine quality that it can absorb the vibrations. Less vibrations comes through the steel of the bracket to the building (walls/ceilings/floors). As a result, a large part of the sound is removed and there is no noise pollution.
High demands
In some situations, the proprietor of the building does not want the occupants or property users to suffer from the installation sound. This includes draining rainwater, indoor plumbing (toilet/bath, etc,), ventilation and expansion of pipes.
High requirements are more common in hospitals, hotels, theatres and apartment buildings. The “dis-connection” of the sound is the solution, but be aware that the weakest link will nullify the best solutions!
The best solution: talk to our experts!
Walraven is happy to help apply the best sound-proofing for your project. A bracket with rubber lining is easy to use and often more than sufficient.
Do you have specific requirements? Please feel free to contact us to discuss this with our experts. They have the knowledge and experience to help you further. Please contact us on for tailored advice.
The post The best sound-proofing for your installation project appeared first on Walraven Singapore.
]]>The post How do I choose the right bracket distance? appeared first on Walraven Singapore.
]]> it is always a new puzzle to solve. One system asks for plastic pipes and other needs copper or steel ones. Or perhaps even a combination of materials. Efficient installing and fixing of tubes obviously also depends on costs, therefore we advise you to take note of the following!
Installers strive for the most efficient way of installing and fixing
What are the rules to determine the distance between the brackets? There are no real guidelines or standards in the engineering sector (especially the W-branch). This means that you as an installer have a degree of freedom. A pitfall of this freedom is that the bracket distance is sometimes made too wide. This can mean, especially with plastic pipes, that the pipes start to bend. Something you do not want with a waste pipe.
An efficient way of installing is to combine different pipes, in diameter, material or even from another installation in one support / fixing. As a rule of thumb the pipes with the shortest bracket distance (by diameter or material) determine the distance used.
But what is the maximum bracket distance?
The maximum bracket distance according to manufacturers
The pipe and tube manufacturers almost always give a maximum permissible bracket (fixing) distance. This distance is determined by the combination of the material of which the pipe is made of and on the diameter (larger diameter, stiffer tube) it concerns. There are many tables on the internet that illustrate this.
With steel pipes the bracket distance is permissible to 6 meters. In practice, you rarely see this. An exception to this rule are long straight sections, because it is not practical to hang up a 6 meter tube in one go. The handling by installers / technicians is in this case a bottleneck.
Another major point is that you have to calculate the weight of the 6 meter tube on the two brackets. This leads to heavy brackets and anchorages. In brief, it is very difficult to have the correct bracket distance shown in table form.
The best solution: talk to our experts!
As an installer, you are ultimately responsible for determining the appropriate bracket distance. You can do this based on your own experience or through reading the manufacturer’s documentation. You can also contact Walraven and consult with our experts.
Together with our experts, you can determine the most efficient (and economical) way of installing and fixing. The way you work, in conjunction with the maximum extent permitted in terms of the materials to be used, are in this case leading.
We have the knowledge and experience to help you with your installation questions. Our experts calculate the ideal distance for your project. Please contact us for tailored advice.
The post How do I choose the right bracket distance? appeared first on Walraven Singapore.
]]>The post How to prevent damage by expansion appeared first on Walraven Singapore.
]]>
Coefficient expansion is leading
Each material (steel, copper, PE, PVC, etc,) has its own specific coefficient for expansion. These coefficients determine how the various materials react to differences in temperature. Steel has an expansion coefficient of 0,012 mm/C° and PE an expansion coefficient of 0,200 mm/C°. In other words: a 10 metre steel pipe set with a temperature difference of 50 C° expands 0,6 mm. A PE pipe of 10 metres expands 10 mm. The expansion or shrinkage is not dependent on the diameter of the tube, but on the length and the material of the tube.
Noise pollution and damage
The expansion of the piping may cause nuisance in the form of sound (material stresses, the ticking of the old central heating pipes) and even damage to the building. This can often lead to pipes breaking which leads to water damage. Therefore it is wise to take this into account during installation.
Good bracket plan and open expansion
A good assessment of the installation (where to set the pipes and how many mm?) helps to create a good bracket plan. The very best solution is to allow the natural characteristics to work ‘freely’ as much as possible.
By placing a fixed point in the right place, we can guide the expansion to this point to ensure no damage or stress can occur on installations. This way we can also minimize the released forces.
There is often no room for ‘nature’ to go its own way. Fixed and sliding points are engineered to make it a controlled expansion. We can also be of service for this.
Would you like to know more about preventing damage and noise pollution by / from expanding pipes? We have the knowledge and experience to help you. Our experts can calculate what the ideal installation method is for your project. Contact us for tailored advice.
The post How to prevent damage by expansion appeared first on Walraven Singapore.
]]>The post How to prevent failure costs as an installer appeared first on Walraven Singapore.
]]>Good planning and preparation
There are numerous ways you can be faced with failure costs during a project. This can include ineffective planning of the construction process or the need to repair and replace parts. Even end products that do not meet the agreed quality requirements can incur extra costs.
Good planning and preparation is half the battle if you want to avoid failure costs. In brief, the right knowledge must be readily available and the details for the purchase of the correct products should be clear in advance. This is how you prevent failure costs from inaccurate estimations.
Consider the installation and fixing materials
An important tip we would like to give you is that the installation and fixing materials should be properly considered at an early stage. When it is time to install, there is no more time to quickly change the order because there is for example, a different type of connection needed than first considered. These types of things should be known beforehand if you want to avoid failure costs.
The best solution: involve us as early as possible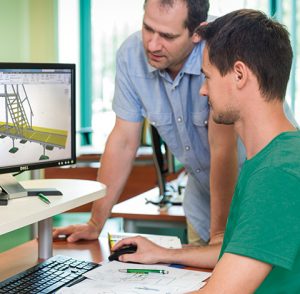
We notice that installation and fixing materials are often not factored into the quotation phase of a project. This results in panic at the end of a project which can be prevented by involving us as early as possible in the process. We are happy to advise and together we can help the project run as smoothly as possible.
A good example is that we think along with our customers about the proper bracket distance. In practice a wider bracket is often used to reduce the costs of material.
However, if it turns out that the piping bends because there is too much distance between the two brackets, the quality will suffer. This is also the case when expansion points and fixed points are ‘forgotten’ or when other installations ‘are in the way’. We happily consider these things with you.
You also prevent failure costs due to the fact that our quality products are tested according to the stringent requirements of RAL and are subsequently RAL certified. You can therefore rely on guaranteed quality. In addition, we produce our products in-house and we randomly test them according to the same stringent requirements.
The post How to prevent failure costs as an installer appeared first on Walraven Singapore.
]]>The post How to prevent corrosion of installation and fixing materials appeared first on Walraven Singapore.
]]>Corrosion occurs everywhere
All ferrous materials, such as steel and even stainless steel, will rust. Therefore it is no wonder that your installations after a certain period of time will start to corrode if they are not handled or treated properly.
Rust expands the material and distorts the installation in the long run. In addition the iron-containing installation and fixing material can become so rusted, that holes appear. Of course, you would like to avoid this and fortunately you can.
Exposure to oxygen and water is the beginning of the corrosion process. Oxygen is in the air, so there is nothing you can do to prevent this. However, you can do something about the water. For example you can determine the humidity of the room in advance. If the area has a high humidity, the material has to have a higher resistance to corrosion.
Various solutions
Solutions to avoid rust include installation and fixing materials made of galvanised material, stainless steel or powder-coated material. Furthermore, galvanised material is also available in varying degrees of corrosion resistance. This is useful as installation material used on dry spots in the building, do not have to be heavily galvanised.
Use the right material for the right situation
In theory, the distinction between the different degrees of resistance to corrosion is evident. However in practice, various types are often used interchangeably. The term ‘galvanised’ does not always mean that the material is rust resistant for your situation.
There is for example, galvanised material available which is perfect for use inside the building. But if this material is used outdoors, it would nevertheless soon begin to rust. As an installer it is therefore important to make a good assessment for each specific situation. You must not only take into account the air conditions and the surrounding environment. But also consider the material in mind to determine the appropriate corrosion class (C1-C5). Is there a thicker layer of zinc or another alloy needed for your situation?
The best solution: Walraven BIS UltraProtect® 1000
If you definitely want to be sure that your installation and fixing materials have a very high corrosion resistance, Walraven BIS UltraProtect® 1000 is exactly what you need. The products of Walraven BIS UltraProtect® 1000 can effortlessly withstand a salt spray test of at least 1000 hours* (according to ISO 9227). Ideal for mechanical installations, solar systems and many other types of installations, both indoors and outdoors.
The post How to prevent corrosion of installation and fixing materials appeared first on Walraven Singapore.
]]>